

if u want to set picture in mycomputer properties just like it then follow these steps .
open ur picture in mspaint and save as the name of oemlogo.bmp
just like it

if u want to add support infomation then create a notepad file and write matter just like it
[General]
Manufacturer = GT Computer Hardware Engineering College
SupportURL = www.gteducation.net
[Support Information]
Line1= For Any Technical Support:
Line2=
Line3= Please Contact
Line4= ~~~~~~~~~~~~~~~~~~~~~~
Line5=DEEPAK AGRWAL
Line6=
Line7= chandigarh
Line8=
Line9= +9779973978
Line10=
Line11= Email Id-
Line12=
Line13= agrsen_deepak@yahoo.com
Line14= ~~~~~~~~~~~~~~~~~~~~~~
now save notepad file as oeminfo.ini
copy both file oemlogo.bmp & oeminfo.ini and paste in system32 folder
note -
for go to the system 32 folder type system32 root command in run prompt
now check properties of my computer


how to change start menu name
if u want to change start menu name then follow these steps - :
1- first download resource hacker for editing explore file from following location
http://www.ziddu.com/dow nload/8368589/ResHack.zi p.html
2- open reshack.exe , it is looklike as fig-1

fig-1
3- click on file - open explorer.exe file as fig-2

fig -2
3- after open explorer.exe file , double click on string table , now double click on 37 , now select 1033 and rename start whatever u want in fig-3

fig-3
4- after rename start click on compile script as fig -4

fig-4
5- now click on file- save as tab and save file as explorerd.exe as fig-5

fig-5
6- after save close this software . now open registry editor by run regedit command from run .
now open HKEY_LOCAL_MACHINE\ SOFTWARE\ Microsoft\ Windows NT\ CurrentVersion\ Winlogon in right side double click on shell and type explorerd.exe and ok look loke as fig -6

fig -6
now close registry and restart pc
1- first download resource hacker for editing explore file from following location
http://www.ziddu.com/dow nload/8368589/ResHack.zi p.html
2- open reshack.exe , it is looklike as fig-1
fig-1
3- click on file - open explorer.exe file as fig-2
fig -2
3- after open explorer.exe file , double click on string table , now double click on 37 , now select 1033 and rename start whatever u want in fig-3
fig-3
4- after rename start click on compile script as fig -4
fig-4
5- now click on file- save as tab and save file as explorerd.exe as fig-5
fig-5
6- after save close this software . now open registry editor by run regedit command from run .
now open HKEY_LOCAL_MACHINE\ SOFTWARE\ Microsoft\ Windows NT\ CurrentVersion\ Winlogon in right side double click on shell and type explorerd.exe and ok look loke as fig -6
fig -6
now close registry and restart pc
Monday, May 31, 2010
CONFIGURE OUTLOOK EXPRESS FOR YAHOO ACCOUNT
o you want to read and send your Yahoo! email with Outlook Express? If you are a Yahoo! Mail Plus user you can. Here’s how to set up Outlook Express to read and send Yahoo! Mail Plus:
Troubleshooting tips
If you still can’t send Yahoo! Mail from Outlook Express, you might be accessing the Internet through an ISP that is blocking the SMTP port. If this is the case, try using port 587 when sending email via Yahoo!'s SMTP server. To change the port to 587:
- From the Tools menu, select Accounts.
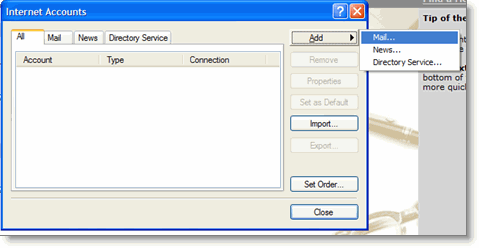
- Select the Mail tab. Click Add > Mail. This starts the Internet Connection Wizard.
- In the Internet Connection Wizard, type your name as want it to appear when you send an email message, and then click Next.
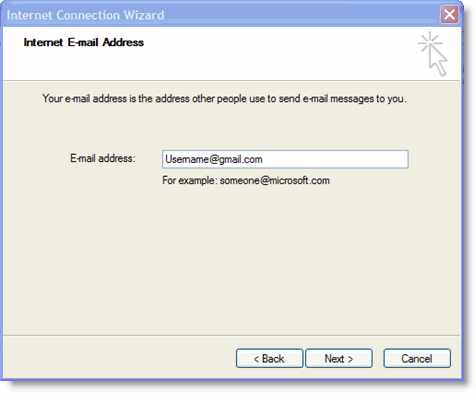
- In the E-Mail address box, type your Yahoo! Mail Plus email address (for example, testing80@yahoo.com), and then click Next.
- In the E-Mail Server Names fields:
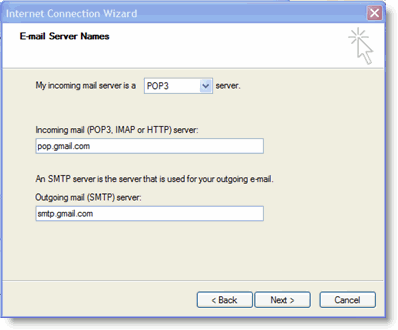
- My Incoming mail server is a: Select POP3 from the pull-down menu.
- Incoming mail (POP3, IMAP, or HTTP) server: Type plus.pop.mail.yahoo.com.
- Outgoing mail (SMTP) server:[/b] Type plus.smtp.mail.yahoo.com.
Click Next.
- In the Internet Mail Logon fields:
- Account Name: Type your Yahoo! ID (your email address without the "@yahoo.com").
- Password: Type your Yahoo! password.
- Select the Remember Password checkbox if you don't want Outlook Express to prompt you for your password each time you check your mail.
- Do not select the Log on using Secure checkbox.
- Click Finish to save your account and exit the wizard.
- The Yahoo! Mail outgoing mail server requires authentication. To turn this on, under Account, select plus.pop.mail.yahoo.com and then click Properties. A properties dialog box for the account appears.
- Click the Servers tab. Under Outgoing Mail Server, select the My server requires authentication checkbox.
- Click the Advanced tab.
- Under Outgoing Mail Server (SMTP), select the This server requires a secure connection (SSL) checkbox.
- In the Outgoing mail (SMTP) field, type 465 for the port number.
- Under Incoming mail (POP3), select the This server requires a secure connection (SSL) checkbox. The port number in the Incoming mail (POP3) field usually changes automatically from 110 to 995. If it doesn’t, type 995 for the port number.
- Click OK to save your settings.
- Click Close to close the Internet Accounts dialog box.


Troubleshooting tips
If you still can’t send Yahoo! Mail from Outlook Express, you might be accessing the Internet through an ISP that is blocking the SMTP port. If this is the case, try using port 587 when sending email via Yahoo!'s SMTP server. To change the port to 587:
- From the Tools menu, select Accounts. The Internet Accounts dialog box appears.
- Click Mail, select plus.pop.mail.yahoo.com, and then click Properties.
- Click the Advanced tab. In the Outgoing mail (SMTP) box, type 587.
- Click Apply, and then click OK to close the Internet E-mail Settings dialog box.
- Click Close to close the Account Settings dialog box.


CONFIGURE OUTLOOK EXPRESS FOR GMAIL ACCOUNT
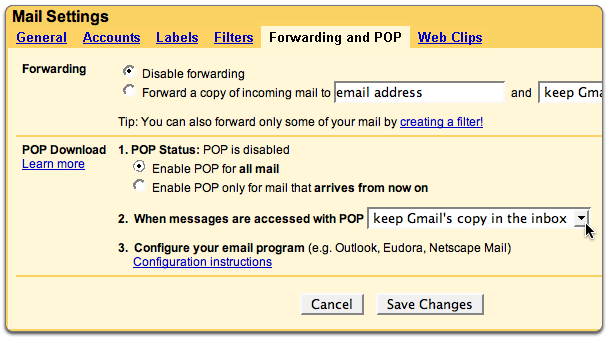
1 Enable pop in Gmail.
Enabling POP You can retrieve your Gmail messages with a client or device that supports POP, like Microsoft Outlook or Netscape Mail.
To enable POP in Gmail:
2 .configure Outlook Express to work with Gmail:
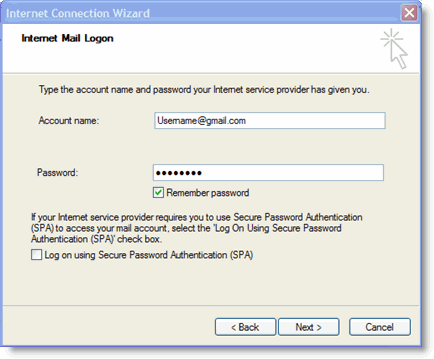
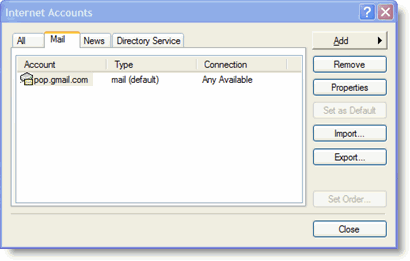
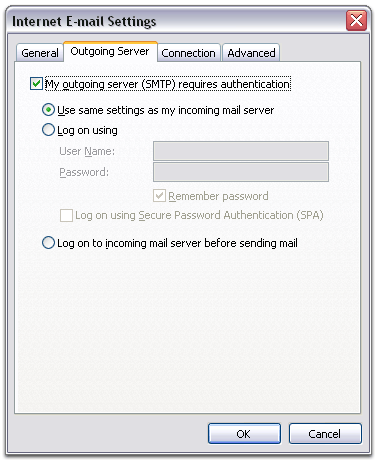
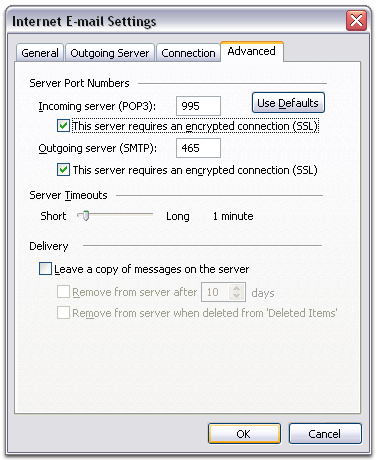
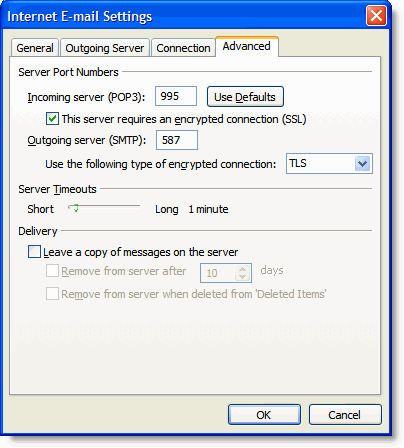
- Check the box next to This server requires a secure connection (SSL) under Outgoing Mail (SMTP) .
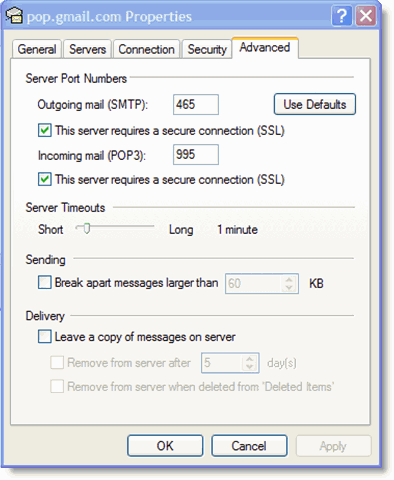
- Enter 465 in the Outgoing mail (SMTP): field.
- Under Outgoing Mail (SMTP) , check the box next to This server requires a secure connection (SSL) .
- Under Incoming mail (POP3) , check the box next to This server requires a secure connection (SSL) . The port will change to 995 .
CONFIGURE MICROSOFT OUTLOOK 2003 FOR GMAIL
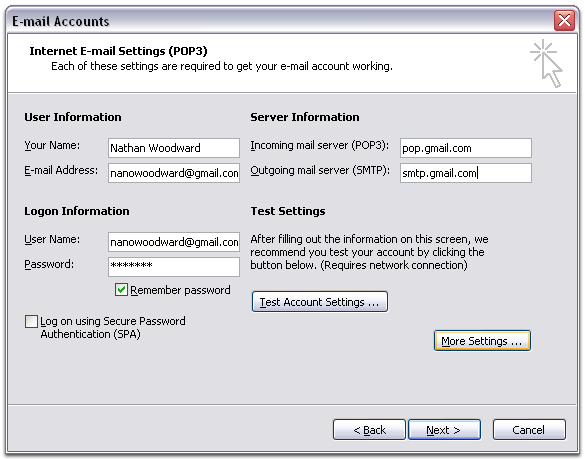
Your Name: Enter your name as you would like it to appear in the From: field of outgoing messages.
Email Address: Enter your full email address (username@gmail.com or username@your_domain.com ) Server Information
Google Apps users, enter the server names provided, don't add your domain name in this step.
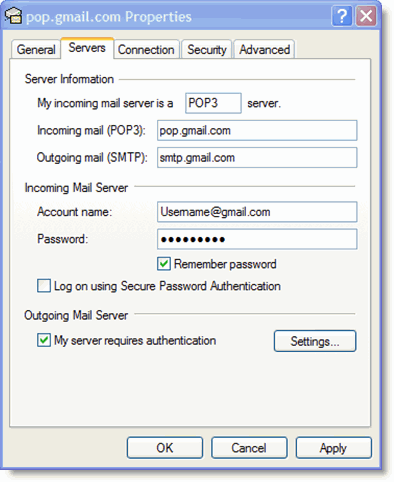
Incoming mail server (POP3): pop.gmail.com
Outgoing mail server (SMTP): smtp.gmail.com
Login Information
User Name: Enter your Gmail username (including @gmail.com ). Google Apps users, enter your full address in the format username@your_domain.com
Password: Enter your email password
CONFIGURE MICROSOFT OUTLOOK 2007 FOR GMAIL
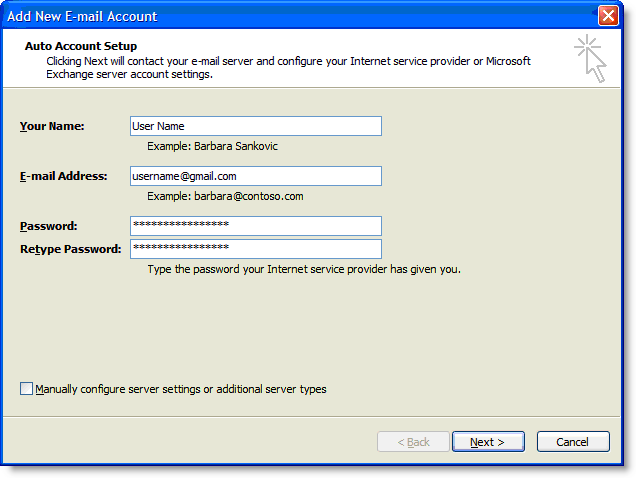
Your Name: Enter your name as you would like it to appear in the From: field of outgoing messages.
Email Address: Enter your full Gmail email address (username@gmail.com ). Google Apps users, enter your full address in the format username@your_domain.com .
Password: Enter your email password.
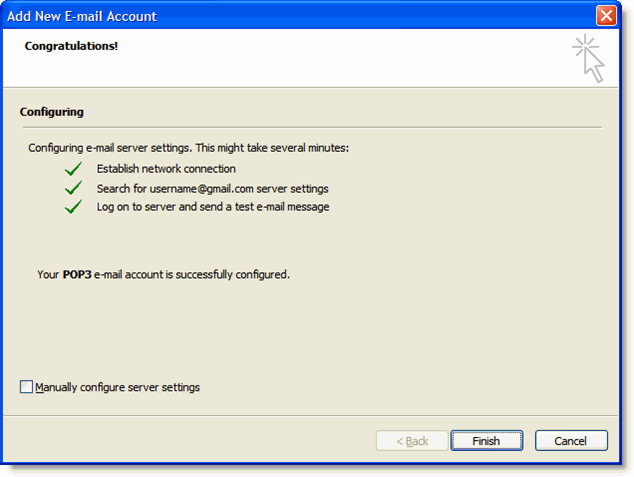
Manually configure server settings or additional server types: Leave this option unchecked if you want to automatically configure Outlook 2007. If you want to manually configure Outlook 2007, check this box now. Google Apps users should configure manually as follows.
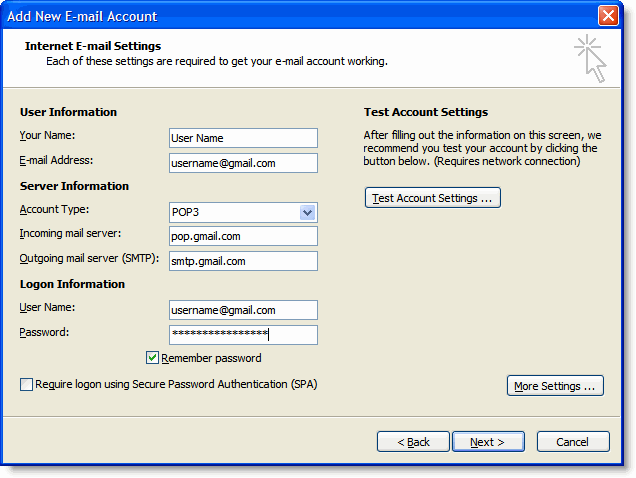
Server Information
Account Type: POP3
Incoming mail server: pop.gmail.com (Google Apps users, enter the server names provided, don't add your domain name in these steps)
Outgoing mail server (SMTP): smtp.gmail.com
Logon Information
User Name: Enter your Gmail username (including @gmail.com ). Google Apps users, enter your full address in the format username@your_domain.com
Password: Enter your email password.
Require logon using Secure Password Authentication (SPA): Leave this option unchecked.
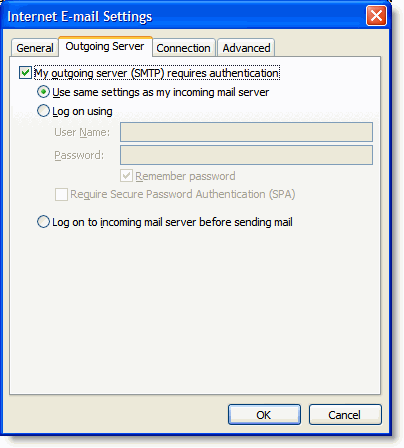
Wednesday, March 31, 2010
Remove all drives from My Computer
1. Select Start , then Run, Start->Run
2.In Run option type regedit
3. HKEY_CURRENT_USER -> Software -> Microsoft->Windows -> CurrentVersion -> Policies-> Explorer
4. In Explorer folder create Dword Value, right click – > new -> DWORD Value, set name for example NoDrive, then modify value in 3FFFFFF
Click OK, after this drives in My Computer will become invisible If you want to make drives visible again, just delete DWORD Value.
*When working in the Registry Editor, be very careful, because any error can cause problems in the functioning of the operating system!
2.In Run option type regedit
3. HKEY_CURRENT_USER -> Software -> Microsoft->Windows -> CurrentVersion -> Policies-> Explorer
4. In Explorer folder create Dword Value, right click – > new -> DWORD Value, set name for example NoDrive, then modify value in 3FFFFFF
Click OK, after this drives in My Computer will become invisible
If you want to make drives visible again, just delete DWORD Value.*When working in the Registry Editor, be very careful, because any error can cause problems in the functioning of the operating system!
Subscribe to: Posts (Atom)


0 comments:
Post a Comment